


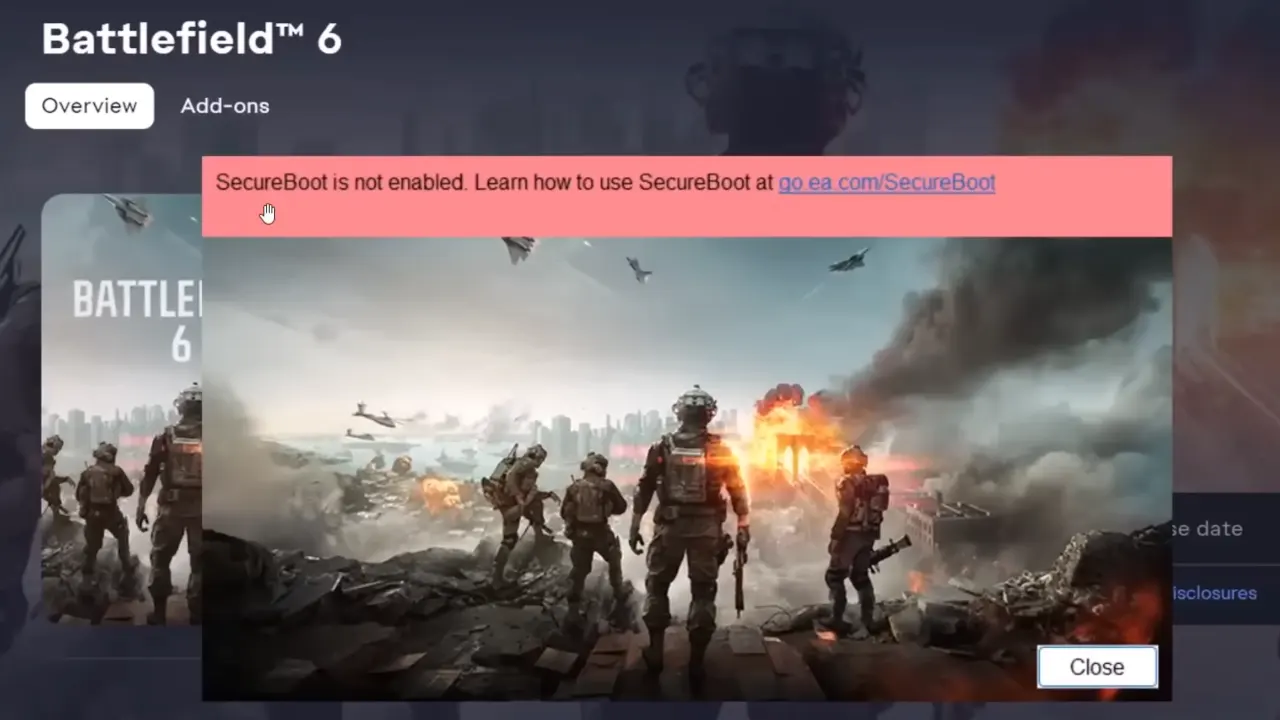
Battlefield 6 has launched with more than just explosions and chaos; it’s also brought along one of the most frustrating barriers for PC players: the Secure Boot error with a message “SecureBoot is not enabled. Learn how to use SecureBoot at [go.ea.com/SecureBoot] (111)”. If your system throws this error message at you when you try to launch the game, you’re not alone. The culprit isn’t a bug or a missing file but a strict requirement for EA’s Javelin anti-cheat system.
This guide walks through why the error appears, what Secure Boot does, and, most importantly, how to enable Secure Boot for Battlefield 6 so it will launch without another protest.
Why Battlefield 6 Requires Secure Boot (and TPM 2.0)
EA’s Javelin anti-cheat operates at the firmware level to detect tampering that software-level systems can’t. To do this safely, it needs two key security features:
- TPM 2.0 (Trusted Platform Module)
- UEFI Secure Boot
These prevent low-level malware or unsigned code from loading before Windows to ensure the anti-cheat can verify your system integrity. Essentially, without Secure Boot and TPM 2.0 enabled, Battlefield 6 refuses to start because Javelin can’t confirm your PC is running in a trusted environment.
So if your Secure Boot State reads “Unsupported” or “Off,” the anti-cheat will block you from the battlefield before you can even pick a loadout.
Related:
- Battlefield 6 Challenges Not Tracking: When They Will Be Fixed
- Battlefield 6 Crashing PC: How to Fix the Issue
How to Fix Battlefield 6 SecureBoot Not Enabled Error
In case you face the SecureBoot is not enabled error or if you need to enable Secure Boot to play Battlefield 6, we have listed down the complete process step by step so you don’t get confused when playing around with this technical part.
Step 1: Check If Secure Boot is Currently Enabled
Before you go into BIOS settings, first confirm is Secure Boot is previously off or already enabled.
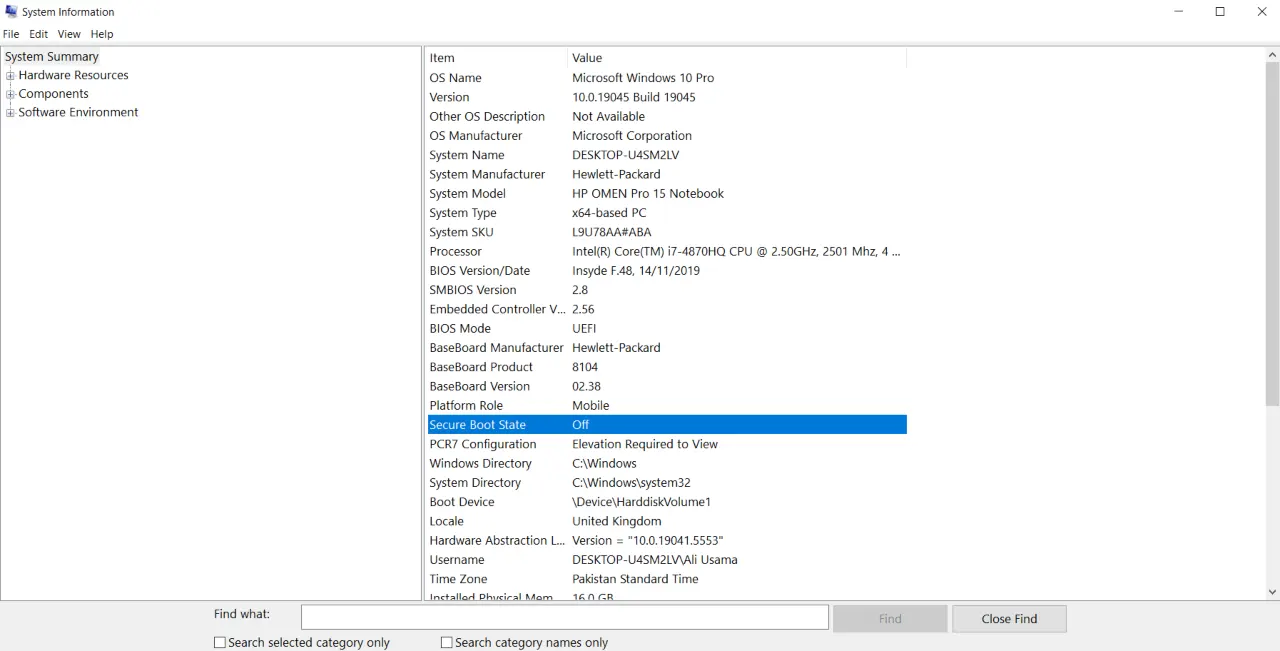
- Press Win + R, type msinfo32, and press Enter.
- In the System Summary window, find these two entries:
- BIOS Mode — should read UEFI (not Legacy).
- Secure Boot State — should be set to On.
If BIOS Mode says Legacy or Secure Boot State says Off or Unsupported, that’s your issue. You’ll need to switch your firmware to UEFI mode and then enable Secure Boot.
Step 2: Make Sure You Have TPM 2.0 Ready
If you have confirmed that you need to enable Secure Boot before you launch Battlefield 6, then first also confirm that TPM 2.0 is active, another Battlefield 6 prerequisite.
- Press Win + R, type tpm.msc, and hit Enter.
- Under “Status,” check if it reads The TPM is ready for use.
If TPM is not available, open your BIOS (details below) and look for “TPM,” “fTPM,” or “PTT” depending on your CPU brand. Enable it, save, and reboot.
If your motherboard doesn’t list TPM or your CPU is too old, that’s likely the end of the road — Battlefield 6’s anti-cheat won’t run without it.
Step 3: Check Your Disk Partition Style (MBR vs. GPT)
Secure Boot only works on systems that use UEFI firmware and GPT partitions. If your system drive still uses the old MBR (Master Boot Record) style, Secure Boot can’t be activated.
Here’s how to check:
- Right-click Start → Disk Management.
- Right-click your main drive (the one with Windows installed, usually Disk 0).
- Choose Properties → Volumes tab.
- Look for Partition Style — if it says GPT, you’re good. If it says MBR, you’ll need to convert it.
Step 4: Convert Your Drive from MBR to GPT (Safely)
Windows includes a tool for converting an MBR disk to GPT without wiping the data, but make sure you have a drive backup, just in case something goes wrong.
- Press Win + X, choose Windows PowerShell (Admin).
- Type this command and hit Enter:
mbr2gpt /validate /disk:0 /allowFullOS
(Change
disk:0If your Windows installation is on a different drive.) - If validation succeeds, run:
mbr2gpt /convert /disk:0 /allowFullOS
- When it completes, restart your PC and immediately enter the BIOS.
Now your drive is converted to GPT and ready for UEFI mode.
Step 5: Switch BIOS Mode from Legacy to UEFI
To run Secure Boot, your motherboard must boot with UEFI mode instead of Legacy (CSM).
So, here’s how to switch from Legacy to UEFI:
- Reboot your PC.
- Tap the key to enter BIOS, usually F2, Delete, or F12, based on your motherboard.
- In the BIOS window, look for Boot Mode, CSM, or Compatibility Support Module.
- Disable CSM and change Boot Mode to UEFI Only.
- Save changes and restart.
Once you’ve done this, your system will now boot under UEFI mode, which unlocks the Secure Boot option.
Step 6: Enable Secure Boot in BIOS
Now is the main step to turn Secure Boot on. The exact menu names are different by manufacturer, but the process is almost the same for all company motherboards:
- Restart your PC and enter the BIOS/UEFI setup again.
- Go to the Boot or Security tab.
- Find Secure Boot — if it’s grayed out, first disable CSM Support (as above).
- Set OS Type to Windows UEFI Mode.
- Change Secure Boot Mode to Standard or Enabled.
- If you see a prompt to “Install Factory Keys” or “Restore Factory Defaults,” confirm it — these are required for Secure Boot to function.
- Save and exit BIOS.
When Windows loads, open msinfo32 again to confirm that Secure Boot State: On appears in System Summary.
Step 7: Update BIOS If Secure Boot Still Says Unsupported
If your Secure Boot State still shows “not enabled” after you have done everything correctly, your motherboard’s firmware might need an updated.
Visit your motherboard manufacturer’s support page, find the latest BIOS or UEFI update for your model, and follow the on-screen steps to flash it. Once updated, re-enter BIOS, ensure UEFI is active, and repeat the same process to enable Secure Boot. This step often fixes old mobos that originally didn’t fully support Secure Boot.
Verify and Launch Battlefield 6
At this point, TPM 2.0, UEFI mode, and Secure Boot should all be active. Double-check in Windows:
- msinfo32 → Secure Boot State: On
- tpm.msc → The TPM is ready for use
If both check out, launch Battlefield 6 again. Javelin anti-cheat should initialize cleanly, and the game should load without the Secure Boot warning.
What to Do If You Still Get the Error
If the error persists even after Secure Boot is confirmed on:
- Reinstall EA App or Origin: Occasionally, the launcher caches the anti-cheat check before you fix the setting.
- Check for Windows Updates: Some updates patch Secure Boot compatibility issues.
- Disable any dual-boot configurations: If another OS is using Legacy mode, it can confuse the firmware.
- Verify Game Files: Corrupted anti-cheat data can trigger false detection.
If none of these help, EA’s official support page for Secure Boot issues can provide board-specific instructions.
Secure Boot and TPM 2.0 are the baseline for modern anti-cheat systems. Activision’s RICOCHET in Call of Duty also requires the same setup, and future competitive shooters will be no exception. Further, Secure Boot improves your PC’s overall protection so it’s not only for games, but also to prevent firmware-level attacks and rootkits.


