


Like many other choices you will face throughout your journey in Dragon’s Dogma 2, there is a dilemma you encounter during the “Spellbound” and “The Sorcerer’s Appraisal“. Both missions are linked to each other and need to be completed at the same time. Spellbound is one of the complex challenges of the game, involving some consequences. During these missions, you have to find 5 grimoires and hand them over to either Trysha or Myrddin (two NPCs you will meet during the objectives) and receive the Maister skills in return.
But the situation you will be stuck in to whom should you give grimoires, as both characters are very keen to get them, and there is an after-effects of your decision. The choice you make could complicate things, pulling other NPCs into the mix and potentially twisting the plot even further. But by playing carefully and perhaps spending some of your hard-earned gold, you can manage the complex situation. This guide tells all grimoires’ locations in Dragon’s Dogma 2, how to complete both quests, and receive all Maister skills along with other rewards in DD2.
- How to Start the Spellbound Quest in Dragon's Dogma 2
- How to Start the Sorcerer’s Appraisal Quest in Dragon's Dogma 2
- Where to Find the Grimoires in Dragon's Dogma 2
- What Happens If You Give Grimoires to Trysha in Dragon's Dogma 2?
- What Happens If You Give Grimoires to Myrddin in Dragon's Dogma 2?
- Should You Give the Grimoires to Myrddin or Trysha in DD2?
How to Start the Spellbound Quest in Dragon’s Dogma 2
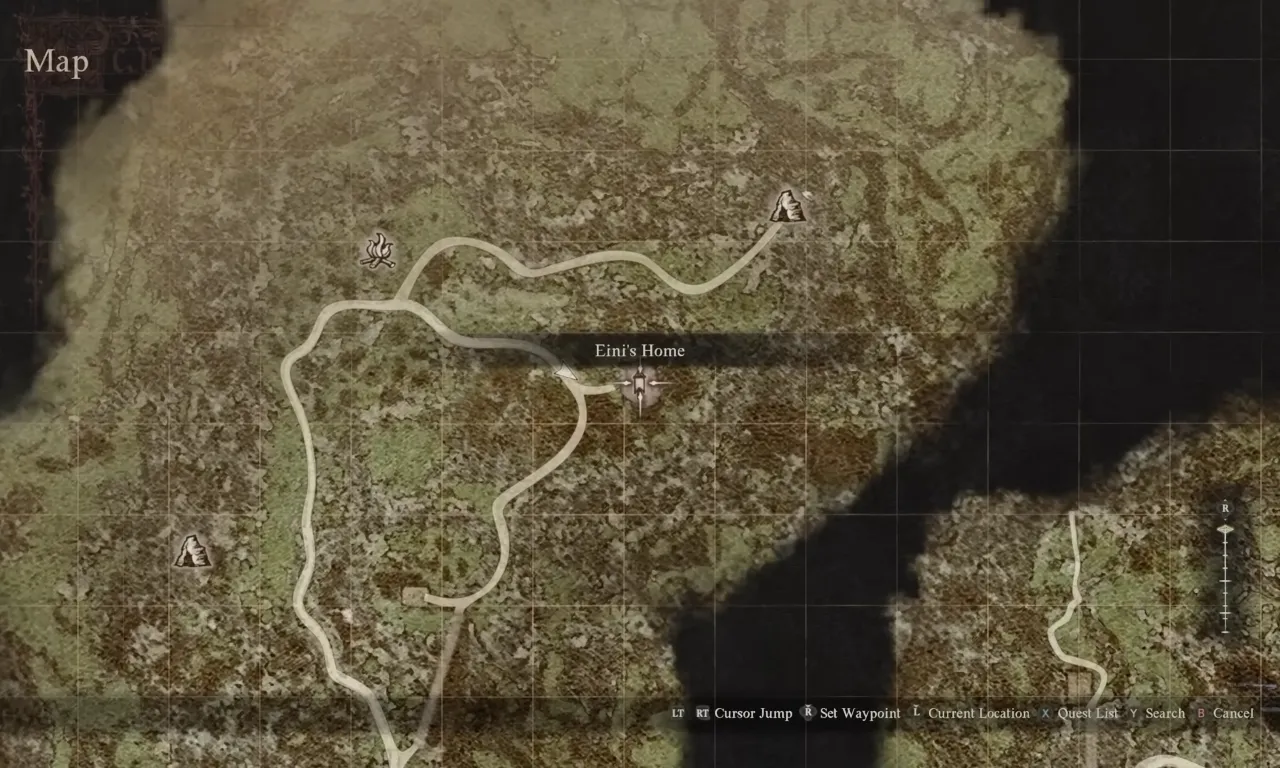
To start the Spellbound quest in DD2, visit Eini’s house to the north of Vermund. Inside the house, you will encounter a scene where Trysha, a young woman with a great determination to learn magic, and her Granny Eini are arguing with each other. It’s clear from the get-go that Trysha is desperate to learn and wield magic, regardless of the rules set against it.
Once the familial storm subsides, wander up the hill from the house to find grandmother, who seems a bit stern at first but gives her a chance to speak her mind. After your chat, head back to the house and talk to Trysha. She’ll confide in you her ambitious plan to gather grimoires so she can learn the forbidden spells including Meteoron and Celestial Paean, and that triggers the Spellbound quest.
How to Start the Sorcerer’s Appraisal Quest in Dragon’s Dogma 2
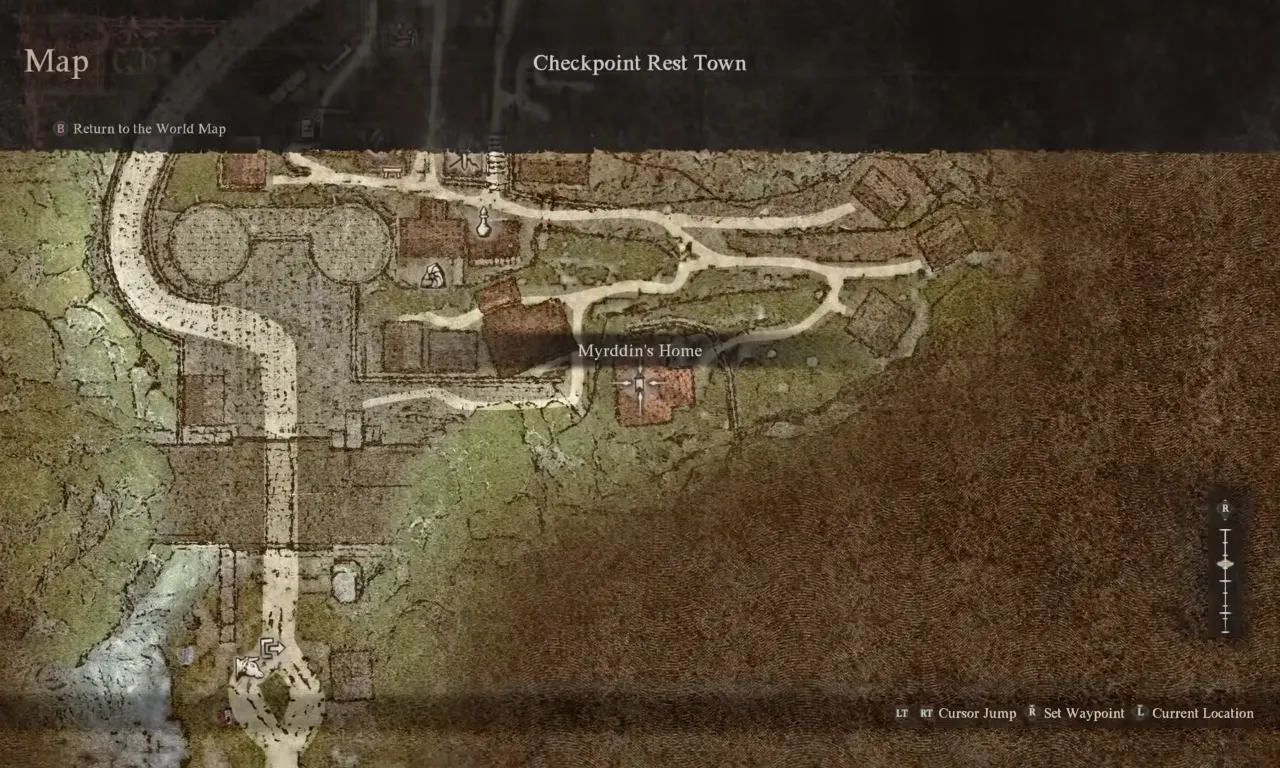
Make your way to the Checkpoint Rest Town in the west of Vermund. Look for a house perched on a hilltop with a locked door. If you attempt to enter, an annoying guy named Myrddin will come out and shoo you away. To make him talk to you, equip the Courtly Tunic and the Courtly Breeches to gain Myrddin’s favor.
Once you’re dressed to impress, Myrddin will change his tune and agree to let you enter his home. After a couple of dialogues, he will tell you that he is lacking grimoires and ask you to help him complete his book collection. Accepting his request will begin “The Sorcerer’s Appraisal” quest, and you’ll be on a hunt for the magic books.
Where to Find the Grimoires in Dragon’s Dogma 2
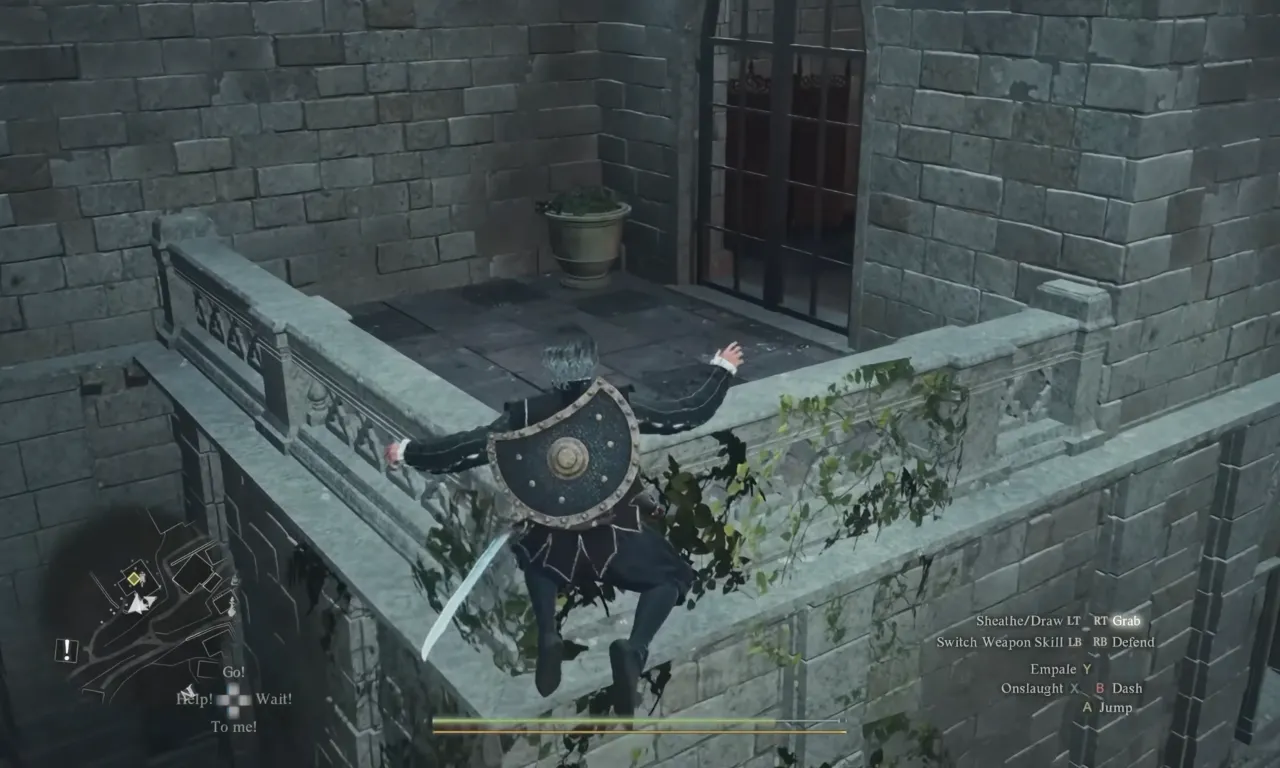
- Grimoire #1 (Let There Be Light) – It’s right under Myrddin’s nose in his home in Checkpoint Rest Town. From outside the house, climb the balcony from the broken wall to enter the second-floor room through the grilling door. There will be a table towards the right with the book on it.
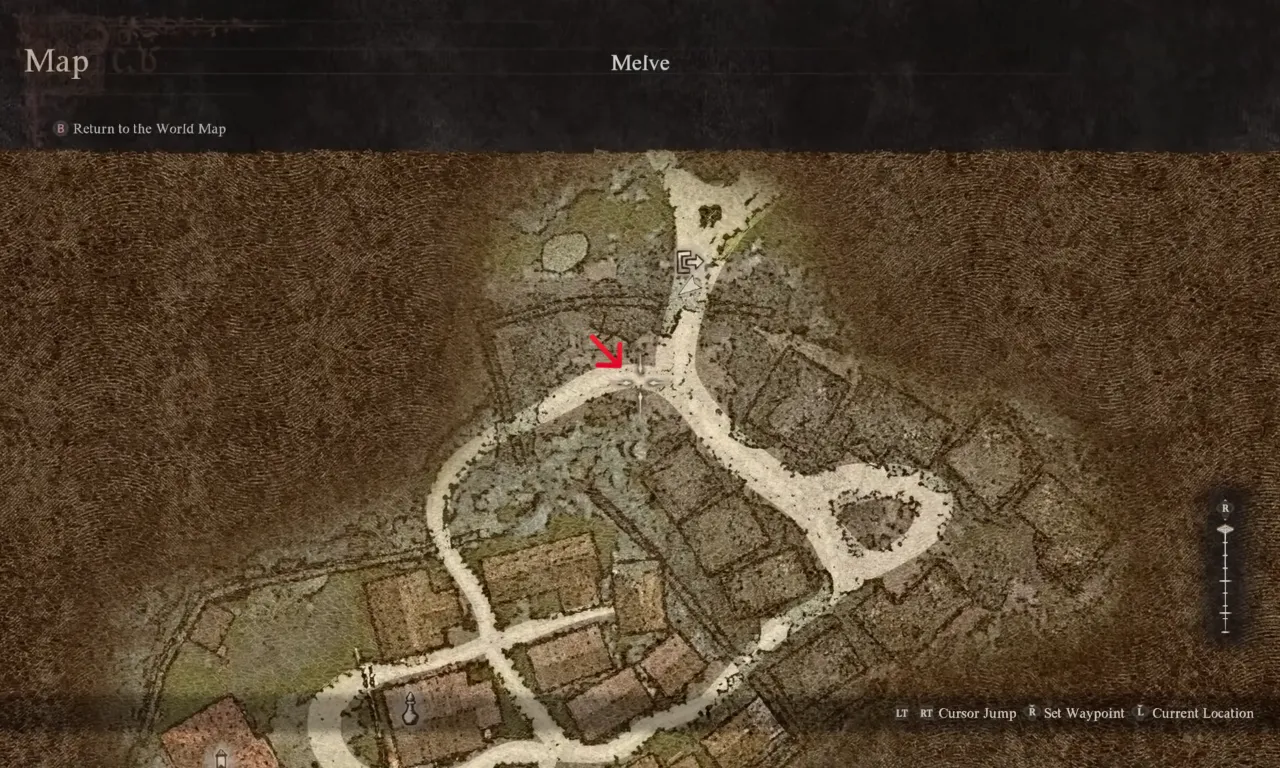
- Grimoire #2 (Fulminous Shield) – Head over to Dudley, a merchant at the entrance to Melve. If you don’t find him at first, rest in the town and come back to look for him. He sells the “Fulminous Shield” for 5,000 G. It’s costly, but there is no other choice than investment.
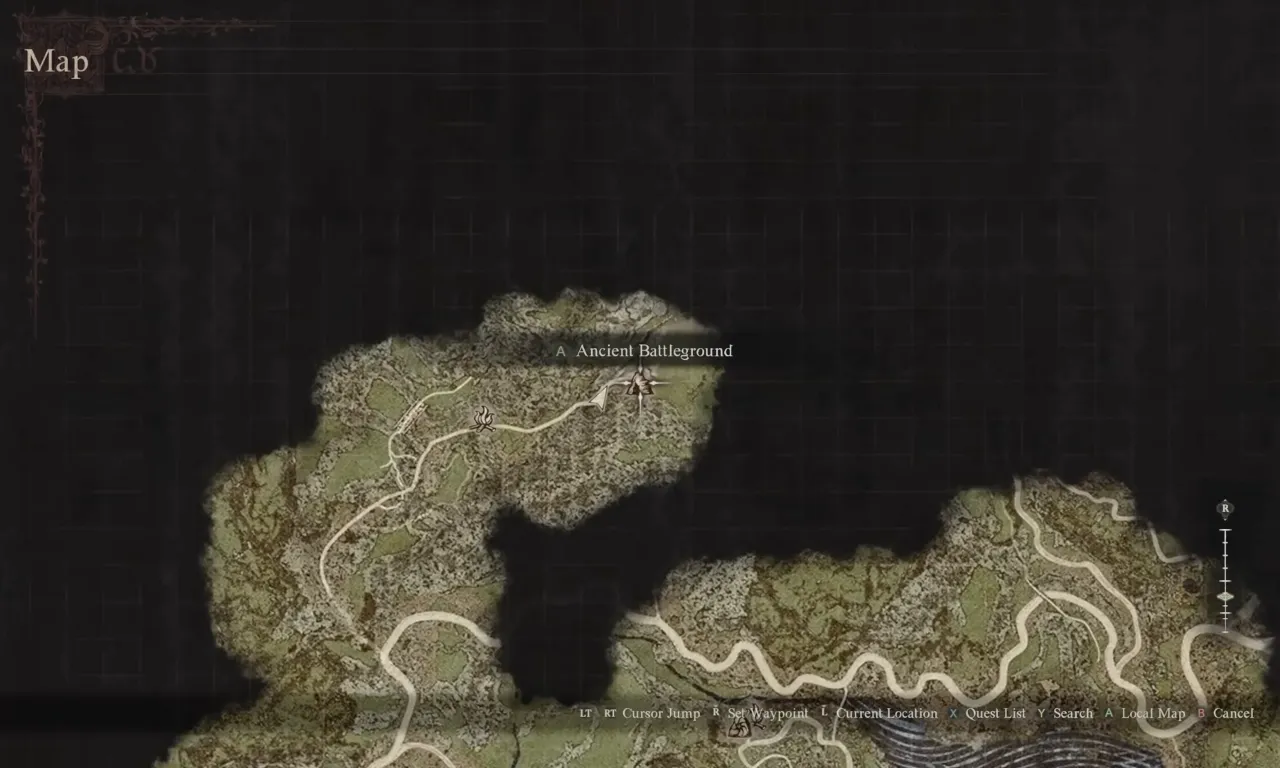
- Grimoire #3 (Nation’s Death Knell First Copy) – Northeast of Checkpoint Rest Town lies the Ancient Battleground. Calmly pass through the monsters without attacking them and walk upwards to enter the dungeon. Use the stairs to go atop and explore the cave. In a large side room, you’ll find the Nation’s Death Knell First Copy magic book.

- Grimoire #3, 4 (Nation’s Death Knell Second Copy & Howling Blizzard) – You can get one copy of Howling Blizzard from Wendy, but she will ask you to give her a book first. Make an extra fake copy of the Fulminous Shield to hand over to her and receive the original book. Secondly, in the Waterfall Cave on the north northeastern side of Melve and the Borderwatch Outpost, go to the second floor through a path and ladder sequence, and be ready for a confrontation; a lich guards this spot, eager to attack you right away. Victory rewards you with not just one, but two grimoires from a red chest.
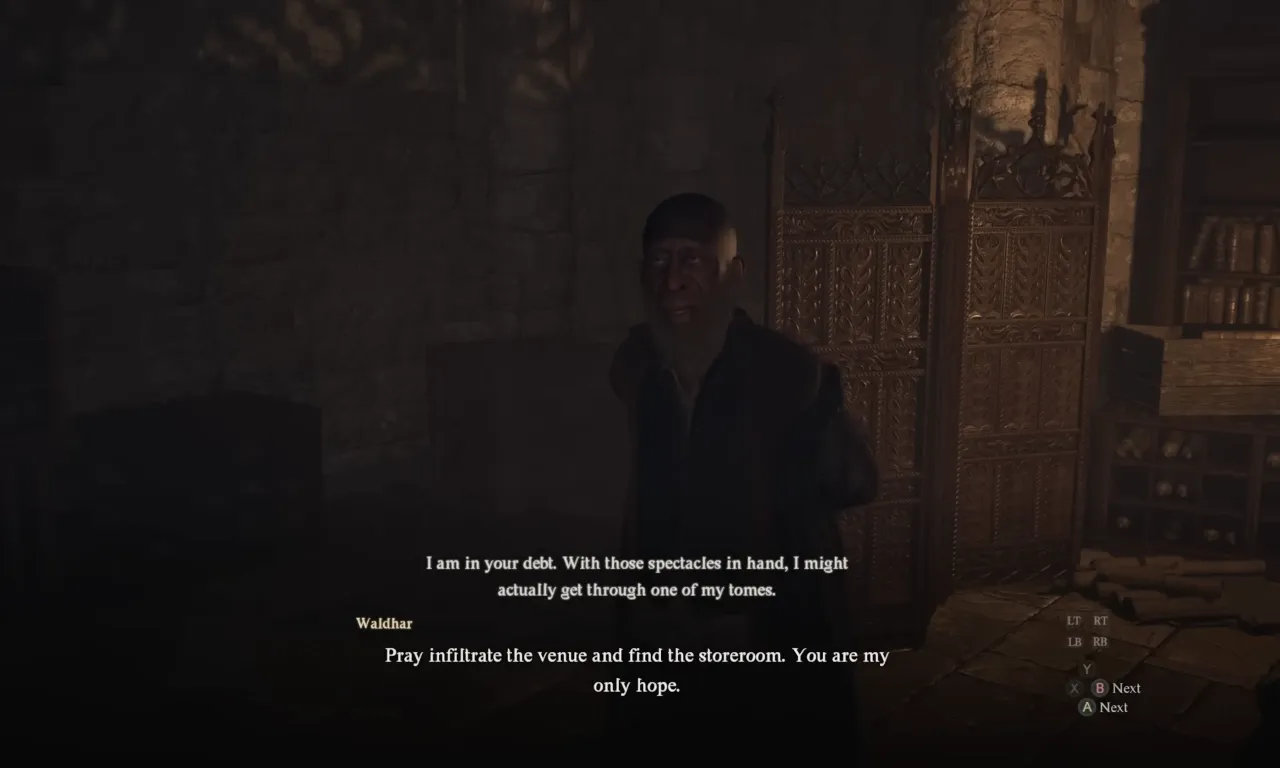
- Grimoire #5 (Towering Earth) – After wrapping up “The Caged Magistrate” quest, you’ll receive this last grimoire from Magistrate Waldhar, who’s recently taken up residence in The Gracious Hand’s Vaults library.
What Happens If You Give Grimoires to Trysha in Dragon’s Dogma 2?
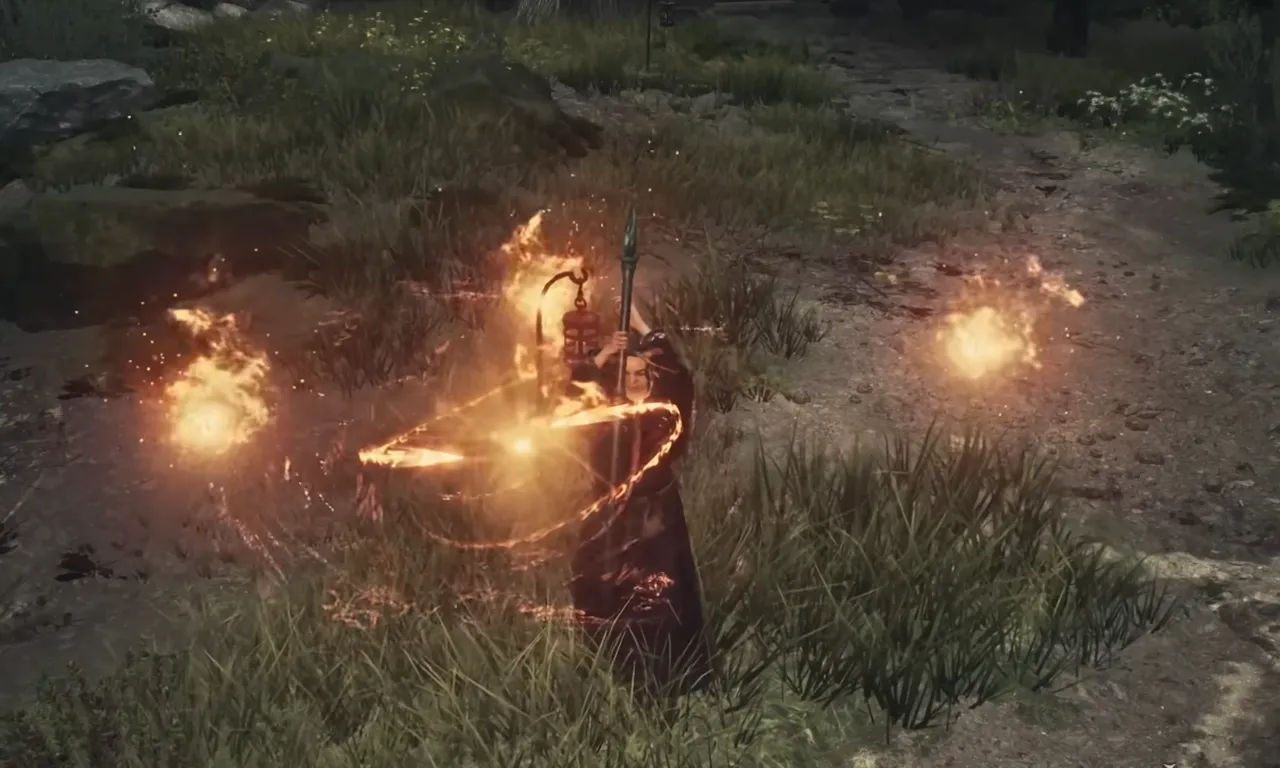
If you side with Trysha and help her learn the magic that’s been forbidden by her Eini, she rewards you with a Turquoise Ring. The quest requires you to rest for a night, and after passing the day, Trysha, overwhelmed by her newfound powers, inadvertently goes on a magical rampage. Magic swirls uncontrollably around her, causing chaos and destruction in her wake.
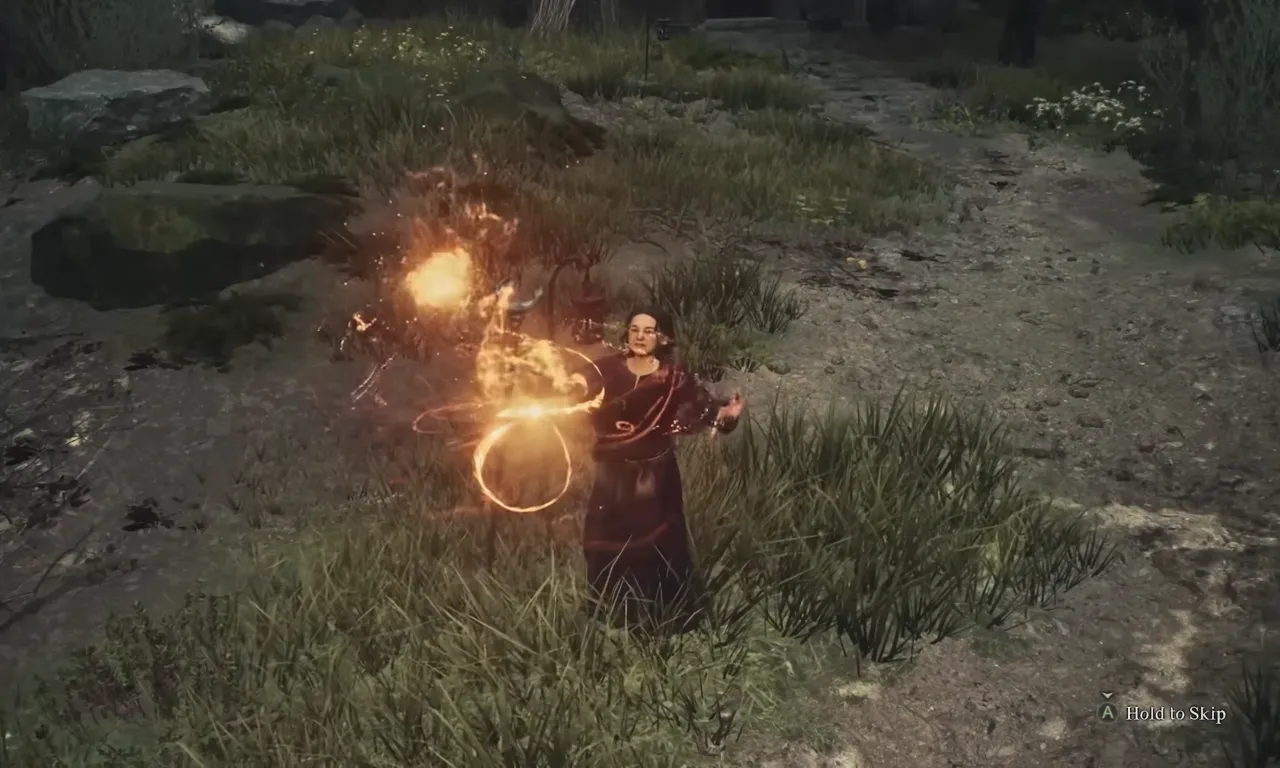
As the Arisen, it’s up to you to handle this explosive situation. You’ll find that attacking her isn’t the best way; it ends the quest prematurely and on a rather tragic note. Save yourself first from getting damaged, and wait until she gets exhausted. Then, get close to her and use the Grab button (right trigger on a controller or E on a keyboard) to subdue her. This non-lethal approach calms the magical storm, leading to a cutscene that gives deeper insight into Trysha’s struggle and her grandmother’s care for her.
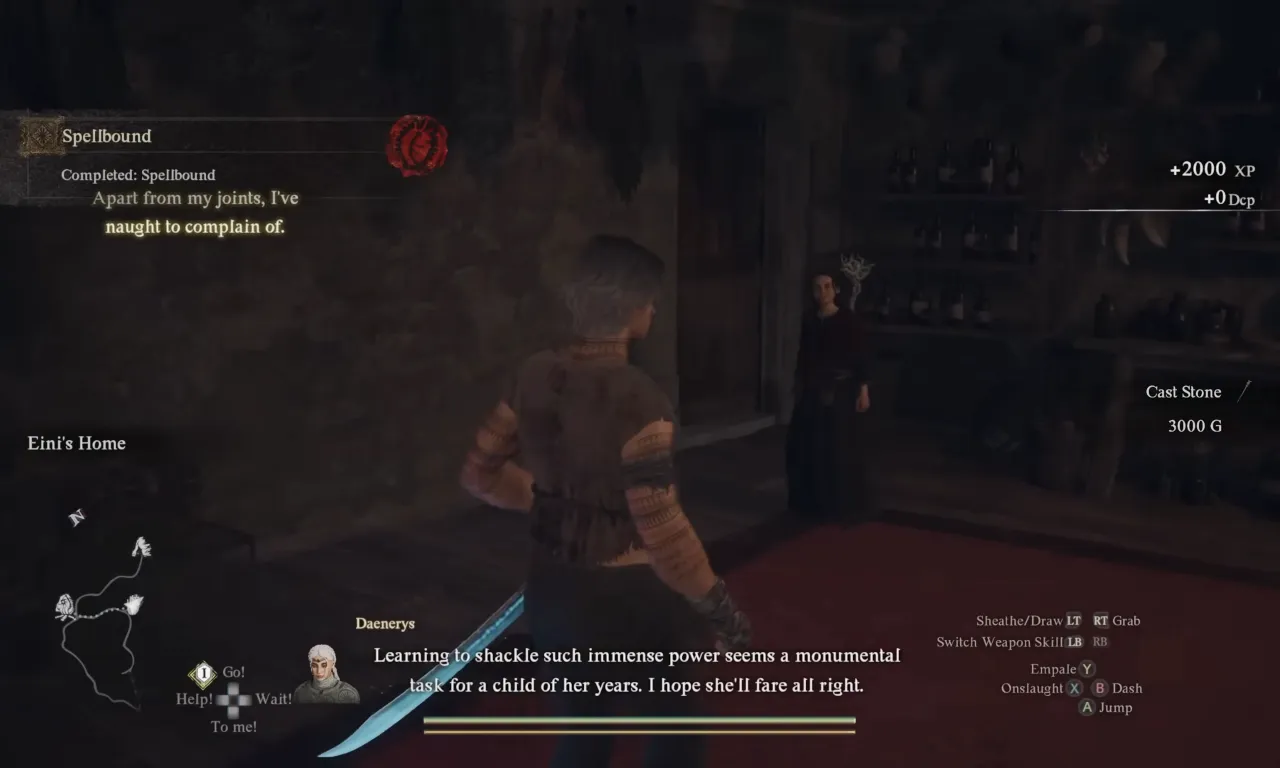
The Spellbound Quest Rewards
After bringing her from the unconscious state, you need to come back after a few days and pay her another visit. You’ll find that Trysha is not only grateful but also deeply reflective about her abilities and the havoc they caused. Your good deed and patience pay off. When you return to Trysha, she thanks you profoundly, not just for the grimoires, but for saving her and potentially others from her uncontrolled magic. She then hands over the rewards:
- Cast Stone: A Mage weapon that increases magical attacks.
- Conjurer’s Jottings and Enchanter’s Almanac: These books unlock the Meteoron and Celestial Paean Maister skills for Mages and Sorcerers, respectively.
- 2,000 XP + 3,000 Gold
While the immediate rewards are quite useful, if you don’t come back quickly after handing over the grimoires, the consequences could be dire. Trysha or even Eini can perish due to the negative magic spells, leading to a failed quest and the loss of potential allies and benefits. It’s better to make a camp nearby and rest there before returning.
What Happens If You Give Grimoires to Myrddin in Dragon’s Dogma 2?
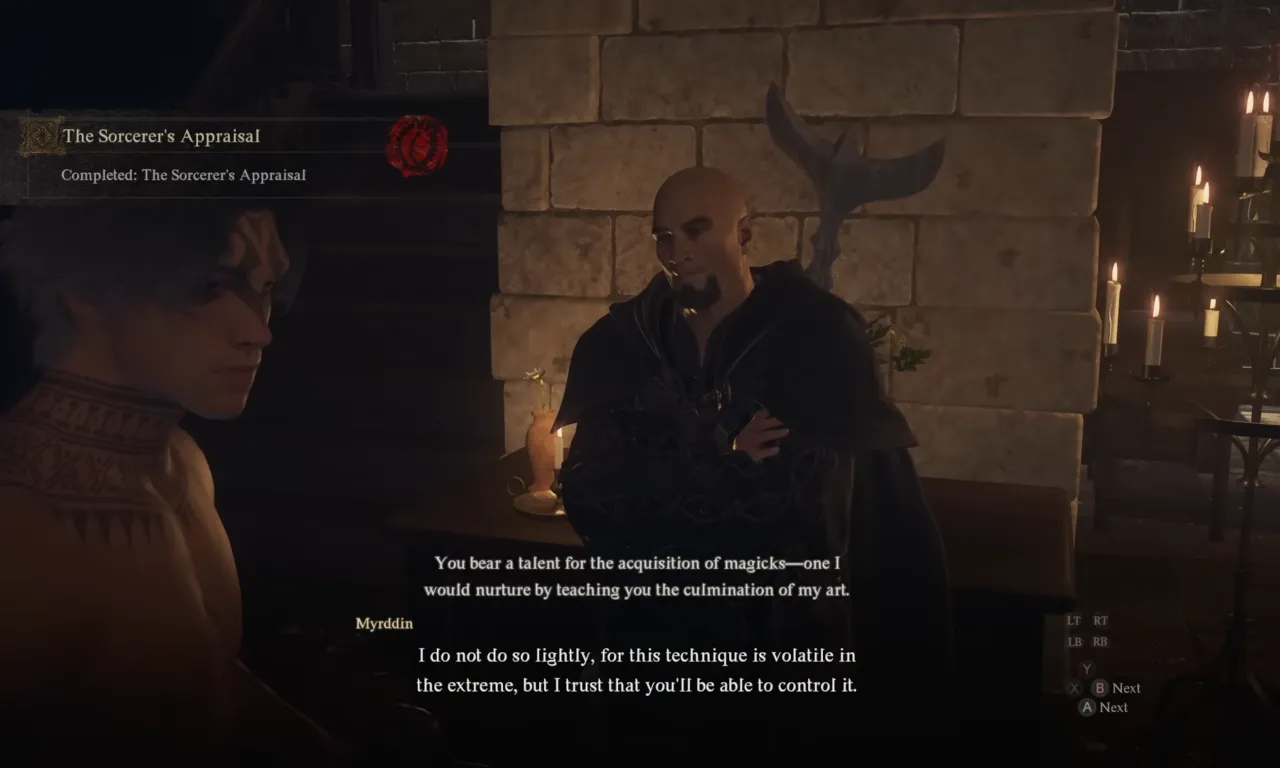
The decision to give the grimoires to Myrddin, the sorcerer with a love for collecting rare books, sets you down a path quite separate from the one you’d travel with Trysha. When you first give the grimoires to Myrddin, the initial interaction is easy, but there’s more than meets the eye. Myrddin is Trysha’s father, which adds a layer of family drama. He is also interested in grimoires, and he wants the exact number of items (three) that his daughter accepts.
The Sorcerer’s Appraisal Quest Rewards
For giving Myrddin the grimoires, you’ll receive these rewards:
- Myrddin’s Chronicle: This item unlocks the Sorcerer Maister skill Maelstrom, a powerful area-of-effect spell that shows the most dramatic magic in Dragon’s Dogma 2.
- Ares Morpho Robe
- 11,000 Gold
Helping Myrddin is simpler in terms of moral complexity compared to dealing with Trysha’s magical mishaps. However, the decision doesn’t end with handing over some books. If you compare what you will reap in both cases, it’s definitely the way to go with Trysha as you will receive two Maister skills but only one by helping her father. But there is a third option to complete both these missions and get all the rewards and skills.
Should You Give the Grimoires to Myrddin or Trysha in DD2?
If you play your cards right, you can satisfy both parties and reap all the benefits. Myrddin, as it turns out, is less picky about the authenticity of the grimoires. He’s a collector and only wants to add the magic books to his collection, so only interested in completing his set rather than the actual content. It opens up a fantastic opportunity: forgery.
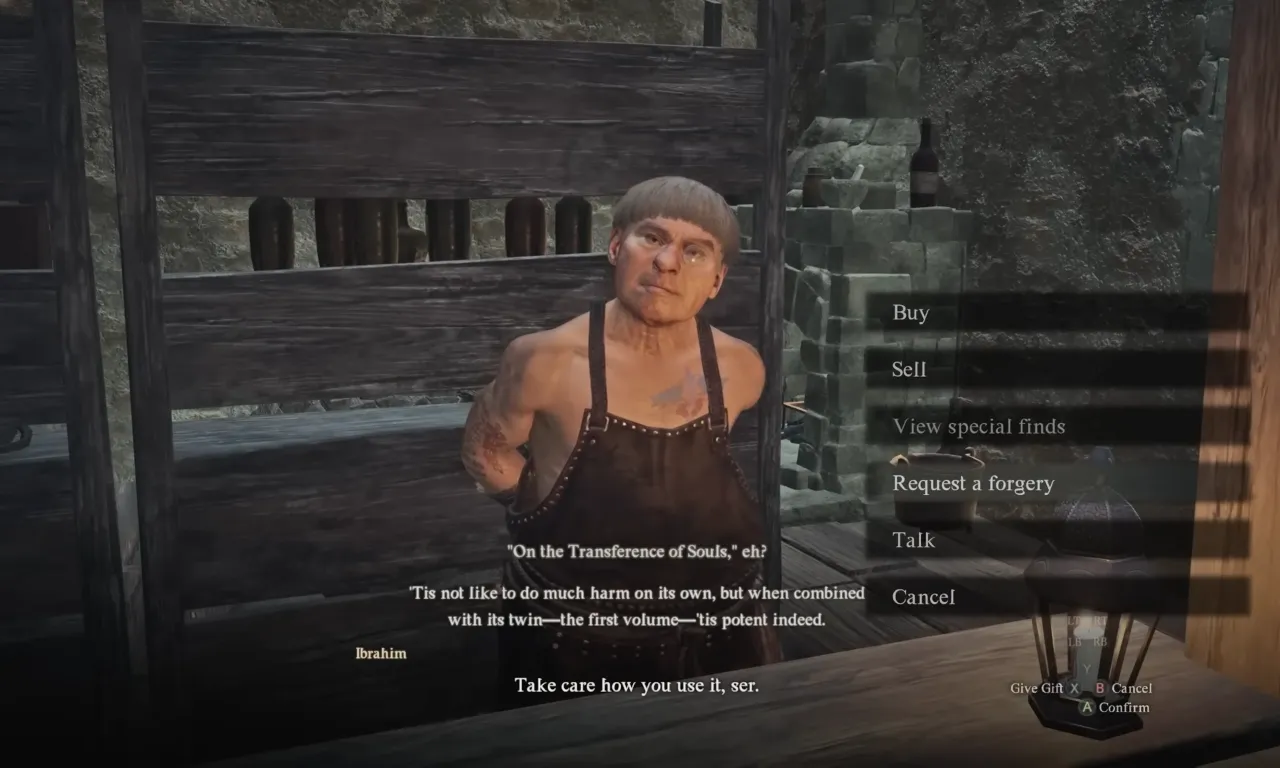
Head over to Ibrahim’s Scrap Shop near Myrddin’s house in Checkpoint Rest Town. Ibrahim is an expert blacksmith in duplicating almost anything, but charges a high amount. One item can be forged by spending 6,000 Gold, and you have to rest for a day to collect the fake item. So, it will cost you a total of 30,000 Gold to forge all five grimoire books. It’s a steep price, but consider it an investment towards acquiring the skills and rewards. Once you have the forgeries, you can strategize how to distribute them. Here’s a solid plan:
- Give the Real Grimoires to Trysha: Since Trysha is focusing on learning the magic within the books, she must get the real books. Handing over genuine grimoires ensures she learns the spells correctly and avoids any catastrophic mishaps.
- Hand the Forge Books to Myrddin: Since he’s more interested in his books collection, he’s less likely to notice or care about whether they are real or fake. So, there is an opportunity to keep him satisfied without sacrificing the more critical needs of Trysha.
By delivering the grimoires to both NPCs, you not only keep them happy but also end the quests in a good way. You enjoy the best of both worlds, earning all the possible Maister skills, and maintaining good relationships. Yes, it has you shell out extra Gold and put in more effort, but it’s well worth the effort in Dragon’s Dogma 2.


