

The Brute is one of Dead Space Remake’s first real wake-up calls—a massive slab of armored Necromorph muscle. The creature is big, deadly, and has a strong tank-like build, with very few weak points and enough strength to knock Isaac across a room. If it’s your first time in the Main Atrium or facing one again later in tighter quarters, this guide will walk you through how to survive, punish, and beat the Brute boss in Dead Space Remake with the best arsenal from weapon tips and Stasis strategy to sneaky Kinesis tricks and smart arena prep.
When and Where You Encounter the Brute in Dead Space Remake
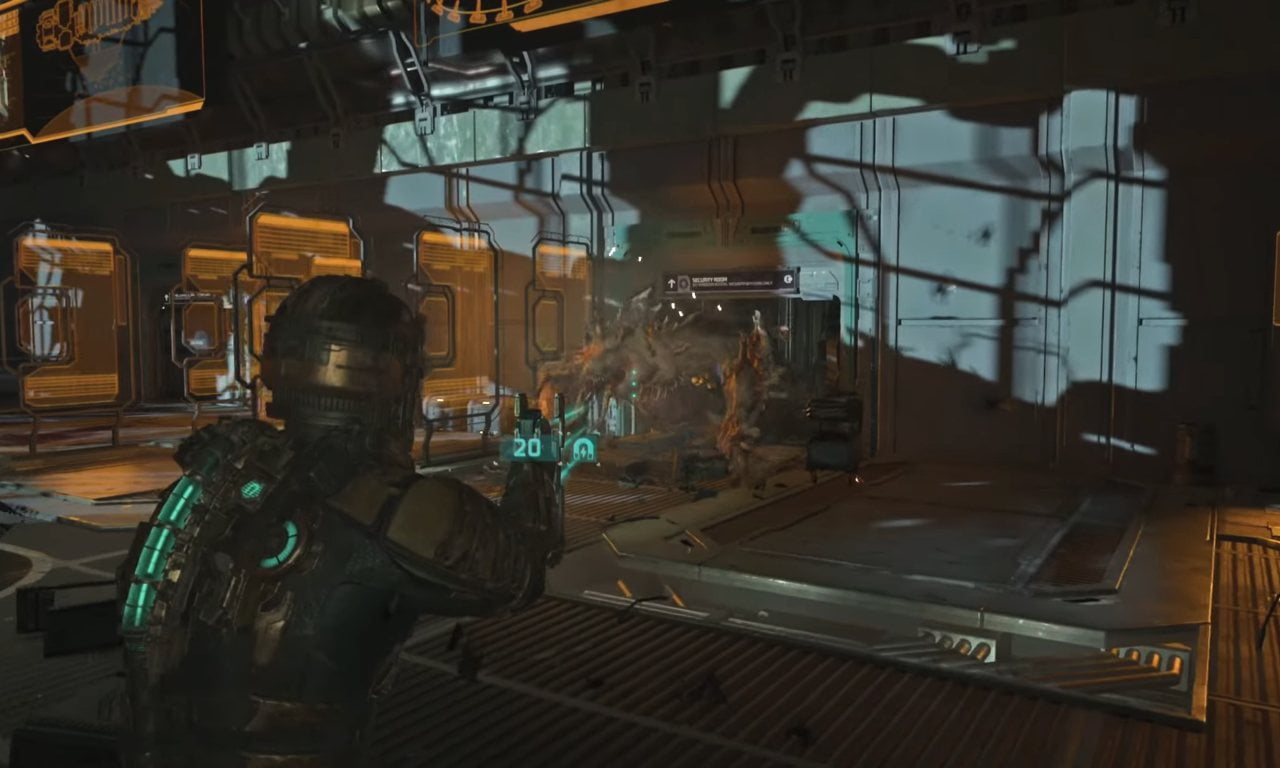
Your first Brute fight occurs during Chapter 4: Obliteration Imminent on the Bridge, right after speaking with Hammond and activating the lift. The boss appears when you backtrack through the Main Atrium and it’s a contained arena fight with no backup enemies. Later in Chapter 4, you’ll face a second Brute during the power rerouting segment inside the Electrical Systems area. That encounter is tougher due to a more confined space and environmental hazards like electrified floors.
Before triggering the fight, walk around the Atrium and loot the area; you need every scrap you can get. Here’s what to look out for that will be helpful in the fight:
- Ripper Blades
- Flamethrower Fuel
- Pulse Rounds
- Credits (for future store visits)
- Stasis Packs
- Health items
The Brute can be tackled with almost any weapon, including the Plasma Cutter, but some tools like the Pulse Rifle, Flamethrower, and Ripper will make the combat much easier, especially when paired with well-timed Stasis usage.
Dead Space Remake Brute Strengths and Weaknesses
The Brute isn’t just a boss—it’s a test of everything you’ve learned up to this point. Think of it as a living tank, all raw power and charging aggression. But the trick is, it’s not unbeatable—you just have to understand how it fights and what it’s vulnerable to.
Strengths
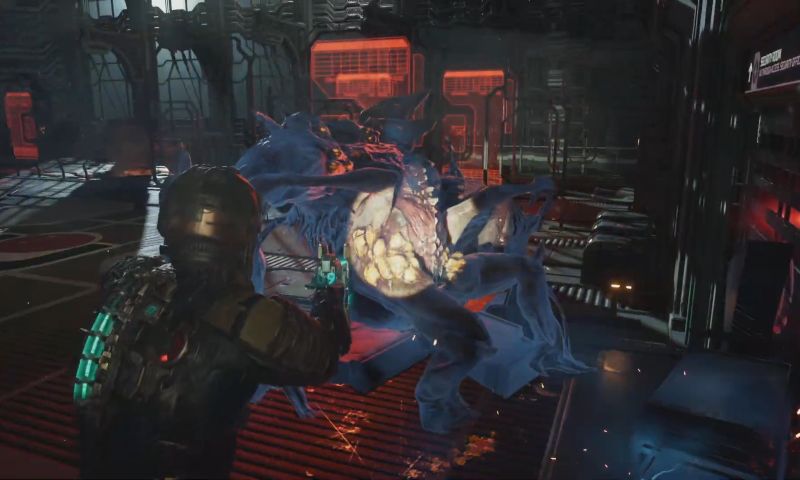
- Frontal Armor Plating: The Brute’s entire front side is covered in thick bone armor that’s nearly impervious to damage. Plasma Cutter rounds, Ripper blades, Pulse Rifle shots, most of it bounces off without hitting the boss. If you’re trying to brute-force your way through its chest, you’re wasting ammo.
- Strong Charge Attacks: Its most dangerous move is the forward charge. Once it locks onto you, it barrels forward at full speed, and if it connects, Isaac gets ragdolled across the room and that can easily result in a death animation.
- Close-Range Brutality: If you try to get too close without a plan, the Brute will swipe with massive arms or stomp on you. It has a fast recovery time after attacks too, so you can’t afford to stand still.
- High HP Pool: Unlike standard Necromorphs that you can dismember in a couple of attacks, this beast is a bullet sponge. You need to be intentional with your shots.
Weaknesses
- Rear Weak Points: The Brute’s only soft spots are at the back including glowing yellow pods near the shoulders and pulsing joints above the legs. Once you strike these weak spots enough, it staggers and becomes much easier to finish.
- Vulnerable to Stasis: Despite its brute strength, it’s weak against Stasis. One blast freezes it long enough for you to get behind and unload; this interaction is what the entire fight hinges on.
- Easily Baited: The Brute’s aggression is also a liability. You can bait it into charging, miss, and then take advantage of its recovery frames to reposition or strike.
How to Beat Brute in Dead Space Remake: Best Weapons and Battle Strategy
The Brute might shrug off frontal attacks, but that doesn’t mean all weapons are equal. Some are just better suited for this fight especially when combined with clever tactics. The Plasma Cutter is still viable in this fight and even better if in its upgraded version. Its precision and ammo efficiency make it suitable to target Brute’s rear weak spots, particularly when he is slowed or staggered – set it to vertical fire mode for more surface coverage when hitting joints.
Tip: Aim for the shoulder joints when the Brute is turned or kneeling, two or three direct shots here do heavy damage.
While Pulse Rifle is typically a crowd-control tool, it’s great in this fight for two reasons: Its rate of fire allows you to chew through the Brute’s weak points fast and the alt-fire sticks to surfaces and explodes on contact which you need to set a trap when the enemy charges. So, stick a mine behind you and bait the Brute into it. Furthermore, Flamethrower though doesn’t do a ton of precision damage, it is useful to attack multiple vulnerable areas at once. It also partially bypasses armor, making it useful even from the front. It lets you stay on the move and apply pressure without worrying about pinpoint accuracy.
If you’re bold enough, bring the Ripper. Its spinning blade does continuous damage and can shred weak spots in close range. You can further pair it with a Stasis freeze to carve through a Brute’s backside. But use it only when you’re confident in dodging, since it forces you into dangerous proximity. The other solid weapon in this battle is Contact Beam which even though is slow, but its charged shot can nuke a weak point in one go. It mainly works its way in the Electrical Systems fight where space is tight and you need to deal burst damage between dodges.
Stasis is a Great Strength Against the Brute
Stasis is the mechanic that makes this entire battle possible. Without it, the Brute will always stay facing you, its weak spots out of reach but by using it, you take control of the battlefield. Right as the Brute charges at you, this is the best time to use it. Right when it lowers its head and starts running toward you, fire Stasis directly at it and if done right, it will freeze mid-charge, leaving its entire backside exposed. If you’re not confident in your timing, do it after it finishes an attack as the recovery animation gives you just enough time to freeze and flank.
To use Stasis the correct way, aim for Brute’s center mass instead of its limbs. Hitting the legs or arms might miss entirely so targeting the body is better. If you have Stasis Packs, use them early not after you’re in trouble. If you don’t have them in inventory, a Stasis Recharge Station is nearby to fill your stock. In the Bridge Atrium, there isn’t one during the first fight, so stock up at a Store beforehand.
How to Dodge and Counter Brute Attacks
Brute is a freight train of muscle and bone that will turn Isaac into a corpse if you get careless. But once you understand its moves and attack patterns, you can kill this monster with much less trouble. This is how to read, avoid, and punish its most common attacks.
The Charge
This is the Brute’s most dangerous move. It lowers its head and barrels forward with incredible speed. If it lands, Isaac gets launched and depending on your health, you might not get back up.
How to Counter:
- Keep mid-range distance so you can see the wind-up.
- Sidestep at the last second, don’t roll backward as it covers too much ground.
Try baiting a charge near a wall or obstacle and if it slams into something, it has a longer recovery animation, leaving you plenty of time to circle around and punish.
Wide Swipes
If you get too close without freezing it or disrupting its attack pattern, the Brute uses sweeping melee swipes that cover a wide arc. These can knock you down or put you in a vulnerable stagger state.
How to Counter:
- Only engage in melee range after a successful Stasis otherwise, keep strafing and baiting instead of rushing.
- After a swipe, it pauses for a second which is a great window to reposition or use Stasis.
Ground Slam / Stomp
In tighter areas, the Brute may raise both arms and slam downwards, creating a short-range AoE shockwave. This is deadly in confined environments where movement is limited.
How to Counter:
- Always fight near the outer edges of the room when the area is limited.
- Use short bursts of movement to dodge sideways, then counterattack.
Acid Spit (Ranged Attack)
Occasionally, the Brute fires a toxic blob from its mouth. It’s rare, but if you’re hanging too far back, it tries to force you in by spitting.
How to Counter:
- Use Kinesis to catch it mid-air and throw it back to deal great damage.
- Otherwise, sidestep or move behind cover; the splash radius is smaller than it looks.
Brute Boss Fight Strategy
As soon as the fight starts, put some distance between you and the Brute. Backpedal to the outer edge of the room to bait it into charging. Stay mid-range as if too close, it’ll swipe and if you create a long distance, it might spit. The middle ground is the best spot for baiting a charge. Right as it lowers its head to charge, fire your Stasis module. If you’re low on Stasis energy, make sure you’ve got a Stasis Pack hotkeyed or stocked up beforehand.
Sprint around to the Brute’s back and fire at the glowing yellow nodes on its upper back/shoulders and back of its thighs or hip joints. If you’re using the Ripper or Pulse Rifle, dump ammo for massive damage right there. Once the Stasis wears off, the Brute will reset. Sprint away immediately, get distance, and reset the loop. Don’t get greedy, getting caught after a successful flank is the fastest way to blow the fight.
If you have another Stasis to use, repeat the same process and if not, bait a melee swipe or charge into a wall to buy time and punish. It’s better to use the Kinesis acid counterattack if it spits. It’s not a must but place a proximity mine behind you, then backpedal to bait the enemy into charging. When it hits the mine and stalls, hit it with Stasis and flank. Stick to this fighting rhythm and you’ll turn every Brute fight into an easygoing.
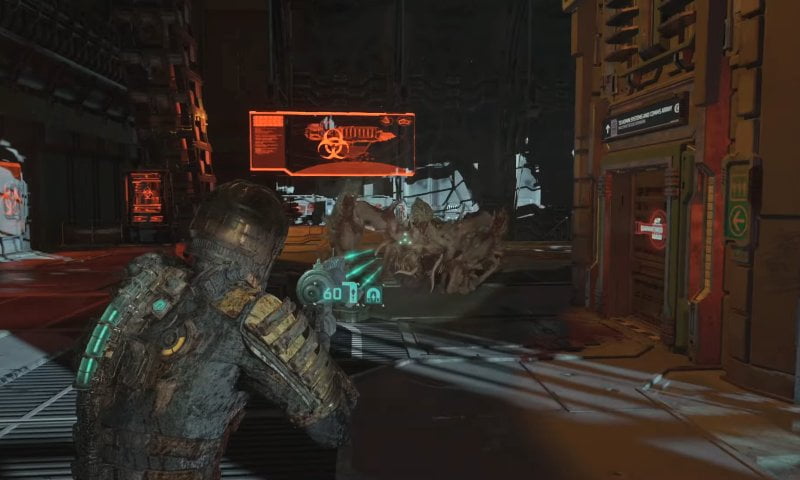
Second Brute Encounter Strategy (Electrical Room)
After surviving the Bridge Atrium fight and progressing through the storyline until later in Chapter 4, you’ll come across another Brute in the Electrical Systems room and this one is even harder thanks to these:
- Tighter arena – Less room to dodge and strafe.
- Live electrical floors – Shocks hurt you and can stun you.
- Environmental hazards – Pipes, corners, and gear restrict movement.
Right before entering the Electrical Systems room, there’s a Stasis Recharge Station so use it and top off your energy now as you need to have it in fight. The big strategy during the combat here is to weaponize the environment by leading the Brute through areas where electric arcs are firing, and using Stasis to freeze it in place directly under a spark trap. Further, the arcs will zap it repeatedly, saving you ammo and giving you windows to attack safely.
How I survived here is by hugging the walls rather than moving to the center of the room. Secondly, make sure you always have a “run-out” path when dodging a charge, and if you’re cornered, throw explosive canisters using Kinesis to stagger the boss. Contact Beam again works well in this fight. Its charged shot can destroy weak points in one hit. Drop a Pulse Rifle mine on a choke point, like a hallway or corner and when space is tight, prioritize mobility over raw damage to survive.
The Brute might be a brute, but it’s not invincible. With smart use of Stasis, strategic movements, and the right gear, you can dismantle this armored juggernaut without breaking a sweat. Keep calm, stay mobile, and don’t waste a single bullet on the thick hide, your ammo and limbs are better off that way.


